드디어...며칠 동안 해도 안되던 https 적용을 완전히 해결했다
정확히는 EC2(백엔드:Spring Boot)에 https를 적용하고 난 뒤
https를 적용한 S3(프론트:React)에서 request하고 response가 정상적으로 오는 것 까지 해냈다
가장 먼저 https를 적용하고 SSL 인증서를 발급받아야 했다
다른 팀원분의 EC2에서 https를 적용하는 것을 여러 번 실패해서 내 EC2에서 했다
나는 운이 좋게 한번에 성공했다
https://luminitworld.tistory.com/85
2-6 AWS에 Let's Encrypt로 HTTPS 적용하기
현재 AWS의 서버 환경은 다음 같습니다. 운영체제 : Ubuntu 18.04 (LTS) 웹서버 : Nginx BL : PHP DBMS : MySQL 웹 서버에 기본적인 부분을 구축했으니 이제 보안 부분을 신경 써보겠습니다. HTTP(Hypertext Tr..
luminitworld.tistory.com
우리가 처해있는(?) 상황과 일치했다
현재 EC2에 Spring Boot 프로젝트가 올라가 있고
https가 적용되어있지 않았다
그리고 도메인은 가비아에서 만들어둔 상태였다
블로그에서 하라는 대로 똑같이 했다
가비아에서 만든 도메인에 아래처럼 설정해줬다
IP주소를 입력할 때 포트번호는 빼고 오로지 IP주소만 입력해야 한다

EC2에 인증서를 설치할 때 콘솔에 입력한 명령어들을 그대로 가져왔다
너무 길어서 필요 없는 부분은 '...'으로 줄여놨다
명령어가 잘 보이도록 충분히 띄어놓았다
nao@DESKTOP-54J7UJF MINGW64 /
$ ssh -i keypair.pem ubuntu@0.00.000.000
...
...
To run a command as administrator (user "root"), use "sudo <command>".
See "man sudo_root" for details.


ubuntu@ip-172-31-36-213:~$ sudo apt-get update
Hit:1 http://ap-northeast-2.ec2.archive.ubuntu.com/ubuntu bionic InRelease
...
...
Fetched 23.9 MB in 7s (3466 kB/s)
Reading package lists... Done


ubuntu@ip-172-31-36-213:~$ sudo apt upgrade
Reading package lists... Done
...
...
done


ubuntu@ip-172-31-36-213:~$ sudo add-apt-repository ppa:certbot/certbot
 The PPA has been DEPRECATED.

To get up to date instructions on how to get certbot for your systems, please see https://certbot.eff.org/docs/install.html.
 More info: https://launchpad.net/~certbot/+archive/ubuntu/certbot
Press [ENTER] to continue or Ctrl-c to cancel adding it.

Hit:1 http://ap-northeast-2.ec2.archive.ubuntu.com/ubuntu bionic InRelease
...
...
Get:7 http://ppa.launchpad.net/certbot/certbot/ubuntu bionic/main Translation-en [4176 B]
Fetched 197 kB in 2s (103 kB/s)
Reading package lists... Done


ubuntu@ip-172-31-36-213:~$ sudo apt install python3-certbot-nginx
Reading package lists... Done
...
...
Need to get 3677 kB of archives.
After this operation, 14.6 MB of additional disk space will be used.
Do you want to continue? [Y/n] y
Get:1 http://ap-northeast-2.ec2.archive.ubuntu.com/ubuntu bionic-updates/main amd64 libjpeg-turbo8 amd64 1.5.2-0ubuntu5.18.04.4 [110 kB]
...
...
Processing triggers for libc-bin (2.27-3ubuntu1.4) ...


ubuntu@ip-172-31-36-213:~$ sudo vim /etc/nginx/sites-available/default
---------------------------------------------------------------------------------
       ...
       ..
       # Don't use them in a production server!
        #
        # include snippets/snakeoil.conf;

        root /var/www/html;

        # Add index.php to the list if you are using PHP
        index index.html index.htm index.nginx-debian.html;

        server_name abcde.shop www.abcde.shop;	<-- 이거만 추가!!(자신의 도메인에 맞춰 수정)

        location / {
                # First attempt to serve request as file, then
                # as directory, then fall back to displaying a 404
                ...
                ..
---------------------------------------------------------------------------------


ubuntu@ip-172-31-36-213:~$ sudo nginx -t
nginx: the configuration file /etc/nginx/nginx.conf syntax is ok
nginx: configuration file /etc/nginx/nginx.conf test is successful


ubuntu@ip-172-31-36-213:~$ sudo systemctl reload nginx


ubuntu@ip-172-31-36-213:~$ sudo ufw status
Status: inactive


ubuntu@ip-172-31-36-213:~$ sudo certbot --nginx -d abcde.shop -d www.abcde.shop
Saving debug log to /var/log/letsencrypt/letsencrypt.log
Plugins selected: Authenticator nginx, Installer nginx
Enter email address (used for urgent renewal and security notices) (Enter 'c' to
cancel): 자신의 이메일 입력!!!!!!!

- - - - - - - - - - - - - - - - - - - - - - - - - - - - - - - - - - - - - - - -
Please read the Terms of Service at
https://letsencrypt.org/documents/LE-SA-v1.2-November-15-2017.pdf. You must
agree in order to register with the ACME server at
https://acme-v02.api.letsencrypt.org/directory
- - - - - - - - - - - - - - - - - - - - - - - - - - - - - - - - - - - - - - - -
(A)gree/(C)ancel: a	<-- Agree 선택

- - - - - - - - - - - - - - - - - - - - - - - - - - - - - - - - - - - - - - - -
Would you be willing to share your email address with the Electronic Frontier
Foundation, a founding partner of the Let's Encrypt project and the non-profit
organization that develops Certbot? We'd like to send you email about our work
encrypting the web, EFF news, campaigns, and ways to support digital freedom.
- - - - - - - - - - - - - - - - - - - - - - - - - - - - - - - - - - - - - - - -
(Y)es/(N)o: y	<-- Yes 선택
Obtaining a new certificate
Performing the following challenges:
http-01 challenge for abcde.shop
http-01 challenge for www.abcde.shop
Waiting for verification...
Cleaning up challenges
Deploying Certificate to VirtualHost /etc/nginx/sites-enabled/default
Deploying Certificate to VirtualHost /etc/nginx/sites-enabled/default

Please choose whether or not to redirect HTTP traffic to HTTPS, removing HTTP access.
- - - - - - - - - - - - - - - - - - - - - - - - - - - - - - - - - - - - - - - -
1: No redirect - Make no further changes to the webserver configuration.
(HTTP 연결을 HTTPS로 리다이렉트 하지 않음)
2: Redirect - Make all requests redirect to secure HTTPS access. Choose this for
new sites, or if you're confident your site works on HTTPS. You can undo this
change by editing your web server's configuration.
(HTTP연결을 HTTPS로 리다이렉트함)
- - - - - - - - - - - - - - - - - - - - - - - - - - - - - - - - - - - - - - - -
Select the appropriate number [1-2] then [enter] (press 'c' to cancel): 2	<--2번 선택!!!!!
Redirecting all traffic on port 80 to ssl in /etc/nginx/sites-enabled/default
Redirecting all traffic on port 80 to ssl in /etc/nginx/sites-enabled/default

- - - - - - - - - - - - - - - - - - - - - - - - - - - - - - - - - - - - - - - -
Congratulations! You have successfully enabled https://abcde.shop and
https://www.abcde.shop

You should test your configuration at:
https://www.ssllabs.com/ssltest/analyze.html?d=abcde.shop
https://www.ssllabs.com/ssltest/analyze.html?d=www.abcde.shop
- - - - - - - - - - - - - - - - - - - - - - - - - - - - - - - - - - - - - - - -

IMPORTANT NOTES:
 - Congratulations! Your certificate and chain have been saved at:
   /etc/letsencrypt/live/abcde.shop/fullchain.pem
   Your key file has been saved at:
   /etc/letsencrypt/live/abcde.shop/privkey.pem
   Your cert will expire on 2022-02-23. To obtain a new or tweaked
   version of this certificate in the future, simply run certbot again
   with the "certonly" option. To non-interactively renew *all* of
   your certificates, run "certbot renew"
 - Your account credentials have been saved in your Certbot
   configuration directory at /etc/letsencrypt. You should make a
   secure backup of this folder now. This configuration directory will
   also contain certificates and private keys obtained by Certbot so
   making regular backups of this folder is ideal.
 - If you like Certbot, please consider supporting our work by:

   Donating to ISRG / Let's Encrypt:   https://letsencrypt.org/donate
   Donating to EFF:                    https://eff.org/donate-le

 - We were unable to subscribe you the EFF mailing list because your
   e-mail address appears to be invalid. You can try again later by
   visiting https://act.eff.org.
축하를 받아야 최종적으로 https가 적용된 것이다
콘솔 내용을 잘 살펴보면 테스트를 해보라고 한다
You should test your configuration at:
https://www.ssllabs.com/ssltest/analyze.html?d=abcde.shop
https://www.ssllabs.com/ssltest/analyze.html?d=www.abcde.shop
SSL Lab Server Test로 가서 도메인에 대한 서버를 테스트 해봐야 한다
SSL Server Test (Powered by Qualys SSL Labs)
SSL Server Test This free online service performs a deep analysis of the configuration of any SSL web server on the public Internet. Please note that the information you submit here is used only to provide you the service. We don't use the domain names or
www.ssllabs.com
도메인을 입력하고 submit을 누르면 테스트를 진행한다

테스트가 끝나면 이런 화면이 나온다
테스트를 통과한거다
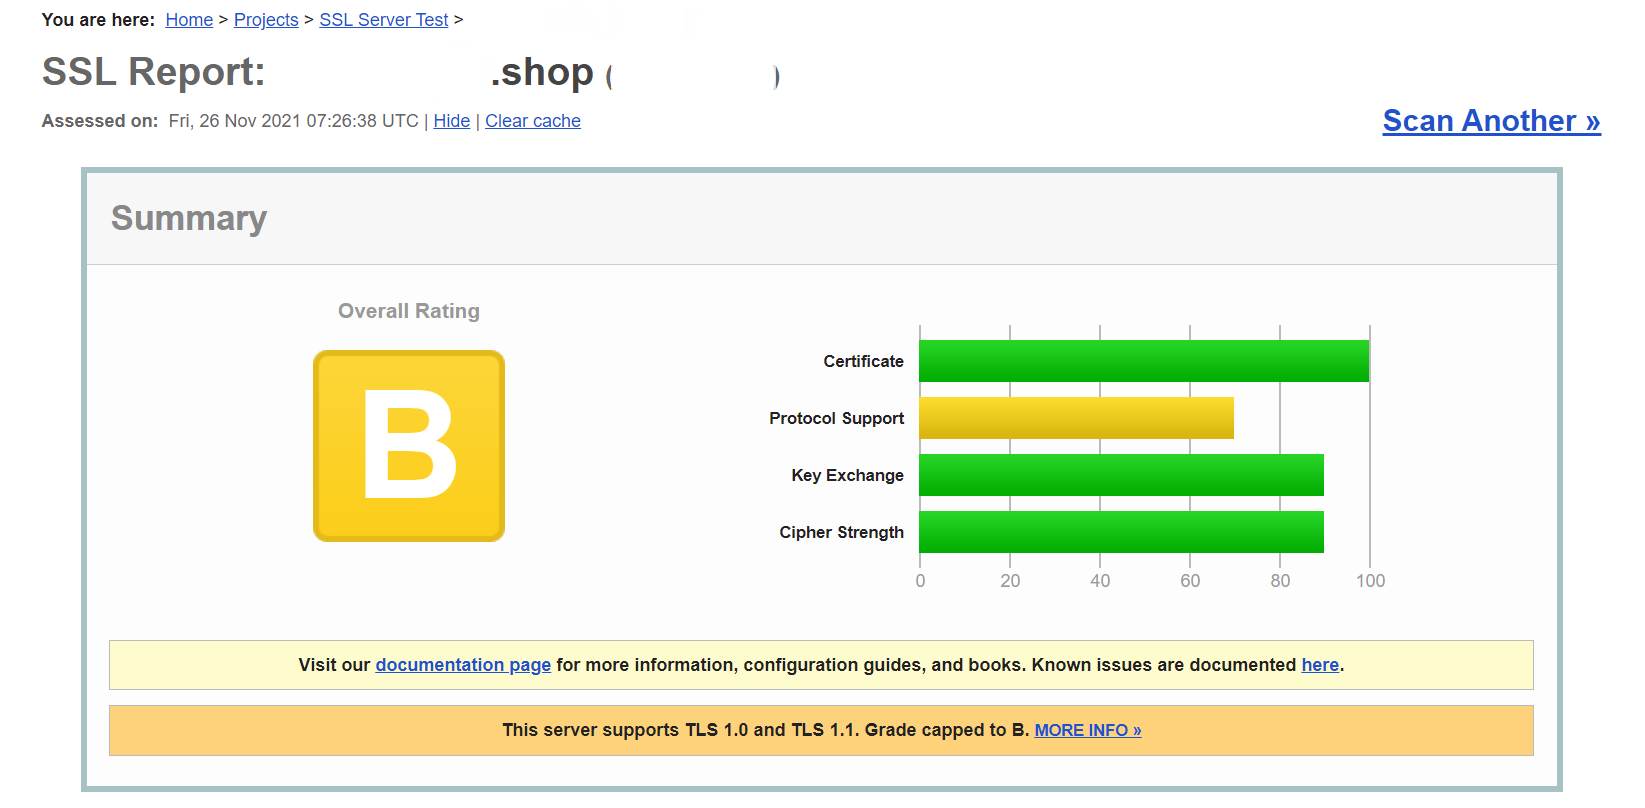
여기까지가 https를 적용하고 인증서까지 발급받는 과정이다
위의 과정을 쭉 따라왔다면 아래처럼 화면이 나타난다

하지만 위 화면은 우리의 프로젝트가 연결이 안 된 상태이다
단순히 도메인에 https를 적용한 것이다
이젠 nginx와 내장tomcat을 사용한 Spring Boot 프로젝트를 연결해줄 것이다
프로젝트를 build해서 jar 파일을 얻어낸다

이 상태로 jar 파일을 실행하면 8080포트로 실행이 된다

8080포트를 80(http)로 우회시킨다
sudo iptables -t nat -A PREROUTING -i eth0 -p tcp --dport 80 -j REDIRECT --to-port 8080
nohup으로 프로젝트를 실행한다

nginx 설정 파일을 수정해줘야 한다
sudo vim /etc/nginx/sites-available/default..
...
server {
..
...
# Add index.php to the list if you are using PHP
index index.html index.htm index.nginx-debian.html;
server_name abcde.shop www.abcde.shop;
location / {
# First attempt to serve request as file, then
# as directory, then fall back to displaying a 404.
proxy_pass http://0.00.000.000:8080;
try_files $uri $uri/ =404;
}
...
..
listen [::]:443 ssl ipv6only=on; # managed by Certbot
listen 443 ssl; # managed by Certbot
ssl_certificate /etc/letsencrypt/live/abcde.shop/fullchain.pem; # managed by Certbot
ssl_certificate_key /etc/letsencrypt/live/abcde.shop/privkey.pem; # managed by Certbot
include /etc/letsencrypt/options-ssl-nginx.conf; # managed by Certbot
ssl_dhparam /etc/letsencrypt/ssl-dhparams.pem; # managed by Certbot
}
...
..이걸 꼭 추가해줘야 프로젝트가 https로 연결이 된다
proxy_pass http://0.00.000.000:8080;이 블로그 보고 알았다
https://dev-alxndr.tistory.com/13
Nginx Spring boot 연동 (reverse proxy)
nignx → spring boot reverse proxy WebServer와 WAS를 분리하기 위해 Nginx를 활용해보도록 하겠습니다 분리하는 이유는 해당 링크 정리가 잘되어 있으니 참고 바랍니다. 아직 Nginx가 설치안되어 있다면 링크
dev-alxndr.tistory.com


드디어 이제 프론트랑 통신할 차례이다
프론트에서 받은 https 도메인으로 들어가 로그인이 되는지 테스트 해봤다
하지만 되지 않았다............
여기서 하루종일 고생했다
지금은 우리 프로젝트에서 안 뜨는 에러라서 퍼왔다

CORS에 대한 에러가 계속 뜨면서 아무리 request를 보내도 response가 안 왔다.....
'Access-Control-Allow-Origin'을 뭐 하래서 nginx에서 설정을 해줘야 되나? 하면서
진짜 여러가지 블로그를 보면서 다 따라해봤다
..
...
        location / {
                #1) 이거도 안 됨...
                #if ($http_origin ~* "^https?://(mycipe.shop|www.mycipe.shop)$") {
                #       add_header Access-Control-Allow-Origin "$http_origin";
                #}

                #2) 이거도 안됨.....
                #add_header Access-Control-Allow-Origin "https://mycipe.shop/";
                # First attempt to serve request as file, then
                # as directory, then fall back to displaying a 404.

                #3) 이거도 안됨....
                #proxy_pass http://3.36.128.220:8080;
                #proxy_pass https://mycipe.shop/;
                #proxy_set_header X-Real-IP $remote_addr;
                #proxy_set_header X-Forwarded-For $proxy_add_x_forwarded_for;
                #proxy_set_header Host $http_host;
                #proxy_set_header X-NginX-Proxy true;

                #4) 이거도 안됨..........
                #proxy_set_header HOST $host;
                #proxy_pass http://3.36.128.220:8080;
                #proxy_recirect off;

                proxy_pass http://3.36.128.220:8080;

                try_files $uri $uri/ =404;
        }
        ...
        ..
nginx가 아니면....프로젝트에서 바꿔야 하나....? 라는 생각이 들어
여러가지 블로그와 다른 조 github를 참고하면서
다양한 방법으로 발악해봤다
[ERROR] The 'Access-Control-Allow-Origin' header contains multiple values
1. 문제 A 도메인에서 B도메인으로 cors xmlhttprequest 요청을 보낼때 The 'Access-Control-Allow-Origin' header contains multiple values 에러가 발생할 수 있다. 예를 들어 S3로 호스팅하고 있는 React에서 N..
minholee93.tistory.com
https://hi0seon.tistory.com/entry/SpringBoot-CORS-%EC%97%90%EB%9F%AC
[SpringBoot] CORS 에러
https://oddpoet.net/blog/2017/04/27/cors-with-spring-security/ CORS 설정과 Spring Security API 서버와 Web FrontEnd 서버를 나누어서 구성할 때 CORS(Cross Origin Resource Sharing) 설정을 해야하는데,spr..
hi0seon.tistory.com
https://www.youtube.com/watch?v=oooV1Ts1NVw&list=WL&index=240
이거 말고도 참 다양한 방법으로 해봤다
다 되지 않았다...
위의 모든 내용은 어제 몸부림쳤던 내용들이다
어제는 이거 때문에 너무 지쳐서 머리에 아무것도 들어오지 않았다
컴퓨터가 안 부서진 게 다행이라고 생각한다
이 이후로 아무것도 안 했다
오늘 아침에 팀원분이 어떤 동영상을 찾았다며 마지막으로 시도해보자고 하셨다
https://www.youtube.com/watch?v=6TYwnURF09w&t=546s
노드js 프로젝트였지만 그래도 우리 상황에 어느정도 해당되었다

마지막으로 이걸 해봤지만 이거 마저 안 됐다....................
진짜진짜 마지막으로 하나하나 주석해가면서 원인을 찾아냈다
nginx 설정 파일 전체를 가져온 것이다
현재 이 파일 그대로 쓰이고 있다
(필요 없는 주석은 모두 지웠다)
sudo vim /etc/nginx/sites-available/defaultserver {
root /var/www/html;
# Add index.php to the list if you are using PHP
index index.html index.htm index.nginx-debian.html;
server_name abcde.shop www.abcde.shop;
location / {
proxy_pass http://0.00.000.000:8080;
#try_files $uri $uri/ =404;
}
#listen [::]:443 ssl ipv6only=on; # managed by Certbot
listen 443 ssl; # managed by Certbot
ssl_certificate /etc/letsencrypt/live/nybae.shop/fullchain.pem; # managed by Certbot
ssl_certificate_key /etc/letsencrypt/live/nybae.shop/privkey.pem; # managed by Certbot
include /etc/letsencrypt/options-ssl-nginx.conf; # managed by Certbot
ssl_dhparam /etc/letsencrypt/ssl-dhparams.pem; # managed by Certbot
}
server {
if ($host = www.abcde.shop) {
return 301 https://$host$request_uri;
} # managed by Certbot
if ($host = abcde.shop) {
return 301 https://$host$request_uri;
} # managed by Certbot
listen 80 default_server;
listen [::]:80 default_server;
server_name abcde.shop www.abcde.shop;
return 404; # managed by Certbot
}내가 해본 것은
아래 두 줄을 주석처리 한 것 뿐이다
#전
try_files $uri $uri/ =404;
listen [::]:443 ssl ipv6only=on;

#후
#listen [::]:443 ssl ipv6only=on;
#try_files $uri $uri/ =404
Spring Boot 프로젝트는 이게 핵심이다
아래의 corsConfigurer 함수를 추가해야 한다
GitHub - Vaccine-life/VaccineLife-api
Contribute to Vaccine-life/VaccineLife-api development by creating an account on GitHub.
github.com
@SpringBootApplication
@EnableJpaAuditing
public class BackEndApplication {

    @PostConstruct
    void started() {
        TimeZone.setDefault(TimeZone.getTimeZone("Asia/Seoul"));
    }

    public static void main(String[] args) {
        SpringApplication.run(BackEndApplication.class, args);
    }

    @Bean
    public WebMvcConfigurer corsConfigurer() {
        return new WebMvcConfigurer() {
            @Override
            public void addCorsMappings(CorsRegistry registry) {
                registry.addMapping("/**")
                        .allowedOrigins("https://프론트도메인.shop")
                        .maxAge(3000)
                        .allowedHeaders("header1", "Origin", "Accept", "X-Requested-With", "Content-Type", "Access-Control-Request-Method"
                                , "Access-Control-Request-Headers", "Authorization")
                        .exposedHeaders("header1", "Origin", "Accept", "X-Requested-With", "Content-Type", "Access-Control-Request-Method"
                                , "Access-Control-Request-Headers", "Authorization")
                        .allowedMethods("PUT", "DELETE", "GET", "HEAD", "PATCH", "POST");
            }
        };
    }

}

이 alert을 얼마나 보고싶었는지...ㅠㅠ드디어 해결되었다!!!!!!!!